Would you like to create your own nail extensions without spending a whole fortune at a salon? You can do it with the new easy to use polygel material. If you’re looking for the best polygel nail kit reviews then you’ve come to the right place.
Today I’ll show you the best polygel starter kit brands and will explain how to apply polygel.
My top 4 picks


What is polygel?
Polygel is a new generation and revolutionary product for creating nail extensions and overlays on natural nails.
It’s one of the nail industry’s latest inventions and nail techs are raving about it.
Polygel is a cross between builder gels and acrylics that is much easier to use. So it’s a great alternative to these materials.
Polygel can help you create a strong and natural-looking set of nails, be it extensions on tips or forms, or an overlay.
Best polygel nail kit brands
High-Quality Pinks And Nudes
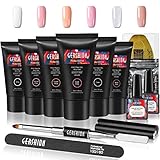
Gershion Polygel Nail Kit

Gersions kit contains all the necessary materials for creating perfect polygel nails.
There are 6 polygels, base coat, top coat, two types of forms, and 1 polygel tool.
Gershion polygel nail starter kit includes 4 polygels in various shades of pink and peach for building natural-looking overlays and extensions and a white polgel that is perfect for sculpting French manicure smile lines.
In addition to that, there is a clear polygel for building extensions that you can use under a coat of colored gel nail polish.
You can also mix that clear material with glitters, pigments, and sequins for creating your own unique designs.
And if you apply it over a painted or glitter background you can create a “stained glass” effect like the trendy “aquarium” nails.
Or just use the clear polygel to form transparent French manicure tips.
This kit also includes a base coat and a top coat formulated to work best with these polygels.
There are 50 pieces of dual forms and 50 pieces of paper forms.
The dual forms are perfect for beginners or for making short to medium-length extensions.
And paper forms are great for advanced users and for creating long nail extensions.
This set also includes a double-ended tool with a spatula on one end for placing polygel on your nails and with a brush on the other end for distributing the product over the nails or forms.
Gershion polygels have great consistency. They are easy to work with.
Another plus is that they come in full-sized bottles, not the little “tester” ones.
All the colored polygels are gorgeous and look opaque even when you apply them in a thin layer.
The clear polygel is really clear, not muddy.
Gershion polygels get completely cured under an LED lamp in 30-60s. Or in 2 minutes under a UV lamp.
They are long-lasting and stay on well without lifting if you apply them properly
This polygel nail kit is great for both complete beginners and advanced users.
A downside of the Gershion kit is that all the dual forms have the same size 10.
So you may need to buy other dual forms separately if they don’t fit.
And the slip solution that helps sculpting and to smooth out the polygel nails is not included.
But you can use 99% Isopropyl Alcohol or any other rubbing alcohol as a replacement.
Cute Pink Polygel Nail Kit
Makartt Pink

Makartt Pink polygel nail starter kit is one of the most complete starter kits on the market.
It contains absolutely everything you need to create polygel nail overlays and extensions and to decorate them with nail art.
This set even comes with an LED lamp.
It’s a mini lamp though with only 6W of power. But it works great with Makartt’s own polygels, with any other polygels, and with most gel nail polishes.
The Makartt kit comes in a super-cute pink gift box and contains 6 polygels.
5 of them come in various shades of pink and fuchsia, including the hot Barbie pink one.
The colors are absolutely stunning!
The sixth polygel is a clear one, which is universal and will work really well with a gel polish coating.
The kit also includes diamonds for nails and four glitters: pink, blue, silver, and confetti.
You can mix these glitters with the clear polygel or you can just apply them over your nail extensions.
It’s a perfect kit for creating trendy and gorgeous pink and sparkling nail art.
The kit comes with all the necessary supplies: a base coat, a top coat, a slip solution, 60 dual forms in 12 sizes, a nail file, and a double-ended tool with a spatula picker on one end and a sculpting brush on the other end.
The only downside is the small size of the tubes. And the mini lamp may not be powerful enough to cure very dark and pigmented gel nail polishes.
Professional Polygel Nail Kit
Gelish Trial Kit

Polygel is actually a registered brand name of Gelish, the company that has invented it.
But the name has already become generic, like Kleenex, Scotch Tape, Velcro, and Shellac.
The founder of Gelish, International Acrylic Nails Champion, Danny Haile wanted to create a material that had all the best qualities of gels and acrylic nail systems, minus their downsides.
That’s how Polygel was born.
By the way, Gelish was also the first company to release LED gel nail polishes.
The Gelish Trial Kit contains only one natural clear polygel for you to work with.
But this tube is very big and the manufacturer promises that you’ll have enough product to create 30-50 sets of nails with it.
After all, you can use any color of gel nail polish over the clear polygel extensions or overlays to get the design you want.
The kit also contains a slip solution, an instructional brochure, a dual-ended PolyTool with a spatula and a brush, and one tube key for squeezing every drop of the product from the tube.
The clear Gelish polygel is strong and easy to shape. It has a great consistency.
And it’s very long-lasting. With proper application, you can make it last for up to 3 weeks.
To make it last longer you can buy the Gelish Fantastic Four set that contains all the products that you may need for working with polygel nails and gel nail polishes.
It contains a base coat, a top coat, a dehydrator, and a primer needed for the nail prep. And all these products are formulated to work with Gelish Polygel.
Gelish Polygel Trial Kit is a perfect polygel starter kit for both beginners and professional nail techs.
You can invest in one high-quality salon-grade polygel and do a myriad of designs with it.
And you won’t have to go to a salon to get a set of strong and beautiful nails.
Polygel Nail Kit With Lamp
Beetles
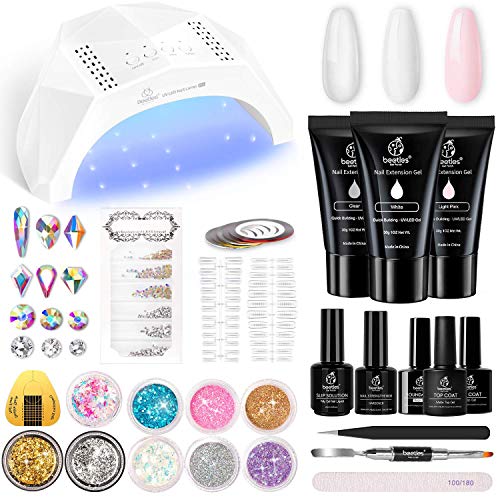
Beetles polygel nail kit is another complete set that contains absolutely all the supplies and tools you may ever need for doing your own polygel nails at home.
Including an LED nail lamp.
The lamp is pretty powerful.
It’s a 48W lamp that can cure any polygel and gel nail polish you may want to use. Even the darkest and most pigmented ones.
And of course, this lamp is perfect for working with Beetles polygels.
The lamp cures the polygels in 60-90s, depending on the thickness of the layer of the material.
Unlike gels, polygels don’t have to be applied in several thin coats. You can apply them in one thick layer and cure that layer under the lamp.
Beetles 48W lamp has four timer settings: 30s, 60s, 90s, and 120s.
The Beetles set contains only 3 polygels: clear, pink, and white.
But these colors are the most necessary ones to have in your polygel nail kit.
The pink one may serve as a natural-looking overlay color or as the base color for French manicure nails.
And the white one is great for forming the French manicure nail tips.
In addition to the polygels, you get a huge assortment of nail art supplies.
This polygel starter kit includes large diamonds in different shapes and sizes, small round rhinestones in several sizes, nail foil flakes in silver and gold, glitter flakes in 6 different colors, and nail decals and tapes.
So you can create an endless variety of designs with these supplies and the clear polygel.
The Beetles set also comes with a base coat, matte and glossy top coats, a slip solution, foil nail forms, dual forms, a nail file, tweezers for picking the nail art decor supplies, and a double-ended tool that has a spatula on one end and a brush on the other end.
According to Beetles, their polygels and gel nail polishes are non-toxic. They are 9-free. So they don’t contain any of the most harmful substances you want to avoid in cosmetics.
It’s a really amazing starter kit for any nail art lover.
The only downside is that the polygels are pretty runny and may be difficult to work with.
Party Nails Polygel Kit
SXC Glow In The Dark

If you want to create stunning party nails then the SXC glow in the dark polygel nail kit is absolutely perfect for you.
It contains 6 polygels: blue, green, yellow, orange, red, and purple. All of them glow in the dark.
The kit also contains a bag with 400 pieces of glow in the dark diamonds and two glitter powders: pink and dark blue.
You also get most of the products and tools you need to use with the polygels: instructions, a double-ended spatula/brush tool, a 100/180 grit nail file, a base coat, a top coat, 30 foil forms, and 70 dual forms in 14 sizes.
You can file both the natural nails and the polygel extensions with the double-sided nail file.
And the collection of dual forms in many sizes will let you select the perfect ones for you.
You can also do party nails for all your friends and family members using these forms.
However, you’ll need to buy the slip solution separately. It’s not included.
SXC polygels are very easy to work with and are not too sticky. They have a nice consistency and don’t require too much slip solution to move them around.
And no bubbles form while you are shaping your extensions.
These polygels actually glow very brightly, especially the yellow one.
The only downside is that they may take longer to cure than polygels from other brands.
You can buy this polygel starter kit to create gorgeous party nails and glow in the dark nail art. Be prepared to get lots of compliments!
Translucent Polygel Nail Kit
Makartt Jelly

Makartt Jelly kit contains 6 cute translucent polygels in lovely pastel colors: coral, magenta, pink, turquoise, light blue, and lemon yellow.
These unique polygels let you create gorgeous nail art and translucent nail extensions.
Makartt Jelly polygels look especially pretty with diamonds and glitter.
This kit comes with the most necessary products and tools.
In addition to the jelly polygels it includes the Makartt base coat, top coat, slip solution, a nail file, a double-ended tool with a brush and a picker spatula, and 60 dual forms in 12 sizes.
So you’ll be able to pick the best size for yourself and do the cute jelly nails for other people too.
And it comes in a beautiful box with a pastel marble design. So this set would make an excellent gift for any nail art lover.
The downsides of this kit are the small amount of product in each tube and the stiff consistency of the polygels. They may require more slip solution for shaping the overlays and extensions.
But it’s a great polygel starter kit if you want to be creative with your nail designs.
Polygel French Manicure Kit
Makartt

This Makartt polygel extensions starter kit is made for those who want to create strong and beautiful French manicure nails at home.
It contains a bright white polygel for sculpting the white smile line, four shades of pink: light pink, dark pink, natural pink, misty pink, and a clear polygel.
You can select the pink color that complements your skin tone or outfit and suits you best.
The clear polygel lets you do French manicure nail art. For example, you can place sequins or glitter inside the clear French smile lines.
All the polygels provide a lovely shiny finish.
You also get a base coat, a top coat, 60 dual forms in 12 sizes that would fit any natural nails, a nail file, a dual-ended spatula/sculpting brush tool, and a detailed instructions brochure.
However, this set doesn’t contain a slip solution. You can either buy it separately or use the 99% Isopropyl Alcohol instead.
It’s a perfect beginner-friendly kit for those who love French manicure nails.
The only downside is that the tubes are pretty small and you may run out of the product quickly.
Polygel Gift Set
Modelones
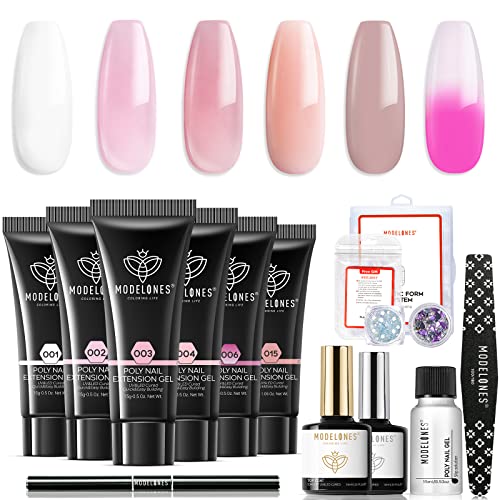
Modelones polygel nail starter kit comes in a gorgeous gift box.
It would make a perfect gift for anyone who loves nail art.
The kit has everything you need for creating beautiful polygel nail overlays or nail extensions.
There are 6 polygels inside. One of them is white.
It’s great for sculpting the French manicure tips.
Another polygel changes color according to the temperature, from white to hot pink. Just like mood changing gel nail polishes.
This is a really cute effect that instantly creates ombre gel nails. And you won’t need any gel nail polish over this polygel. It looks great on its own.
Four other polygels come in milky pink and neutral colors.
You can use them under a gel nail polish or on their own.
They are also perfect as the base for the French manicure nails.
There’s no clear polygel in this set. And this can be a downside for people who love designs with transparent effects.
The Modelones polygel nail starter kit has a set of tools that you can use when doing your nails.
There’s a 100 grit nail file for filing and buffing your nails before creating nail extensions.
Your extensions will stay on better after you buff the shine off them.
There is also a brush for moving polygel around your nail and for sculpting the extensions and a spatula tool on the other end of the brush for picking the polygel out of the tube.
A base coat and a top coat also come with this set.
The only downside is that these polygels are pretty sticky so you may need to use more slip solution than with some other polygels.
Polygel Nail Kit With Lamp For French Manicure
Morovan

Morovan polygel nail starter kit is another complete set for working with polygels on this list.
Not only does this kit come with 8 polygels, but it also contains a lamp.
The lamp has 48W of power. So it can cure all these polygels and any gel nail polishes with no problems.
It has 3 timer settings to work with all kinds of gel-based materials: 30s, 60s, and 90s.
And it has an automatic sensor. So it starts working only after you put your hand under the lamp.
The polygels come in 6 different shades of pink and peach.
So you have a great selection of colors for your French manicure nails.
There are also a white polygel for the tips and a clear one for other kinds of nail art, and for using under gel nail polishes.
The kit comes with all the most necessary supplies for creating polygel nails.
There’s a slip solution, a base coat and a top coat, a set of 100 dual forms in different sizes, a nail file, and a brush+spatula tool.
The polygels are quite thick but easy to move around.
The downside is that the tubes are pretty small.
Overall, the Morovan set is an amazing starter kit for French polygel nails.
Glitter Polygel Starter Kit
Saviland

This polygel starter kit is perfect for making gorgeous pink and glitter nail art.
It contains 7 polygels.
Four of them are clear ones with a large amount of glitter mixed in: light pink glitter, mauve-pink glitter, silver sequins, and confetti sequins.
There are also two opaque pink polygels: a pastel light pink one and a hot Barbie pink one, and a white polygel for creating all kinds of French manicure nails.
The pink colors are not nude-like ones. So your French manicure will be bold and colorful.
You can also mix and match all the colors and glitters for amazing candy-like nail designs.
This kit has everything you need for creating stunning nails.
It comes with a base coat, a top coat, a slip solution, 24 dual forms, a set of instructions, a dual-ended spatula/brush tool, and even a nail file.
A downside is that the dual forms that come with this kit are very curved.
They may work well for those who have their natural nails curving up to counterbalance that curve.
But you may want to buy a different set of forms to use on your nails, especially if your natural nails are curved downwards.
Another downside is that there is not too much product in each tube. Usually enough for about 2-3 sets of nails.
Still, Saviland is a perfect kit for people who love bright Barbie pink and glitter nail designs.
These polygels are also a great match for any nail art with diamonds.
Glitter French Manicure Polygel Nail Kit
Vrenmol
This is another polygel starter kit with glitters.
Vrenmol set contains 3 plain polygels.
Two are opaque pink gels in two different shades, and the third one is white for making the French manicure tips.
Three other polygels are clear ones with lots of glitter.
The manufacturer has named them “crystal glitter” polygels. They all contain small sequins.
One polygel contains multicolor confetti sequins.
Another one contains stunning pink mauve glitter.
And the third one has silver glitter sequins mixed in.
The glitter polygels are colorless and get their color from the sequins mixed into them.
You can mix and match all the products in this kit to create your own nail designs.
Each polygel comes in a 15g tube, and each tube is packed to the brim, which is a nice amount of product.
According to the manufacturer, the glitter polygels have a very high viscosity and may be difficult to squeeze out when it’s cold.
These polygels also take more time to cure than products manufactured by some other brands.
They cure in 90s under an LED lamp and in 2 minutes under a UV lamp.
Vrenmol polygel nail kit doesn’t include any forms, dual forms, tools, base coats, top coats, or a slip solution.
You’ll have to buy all these products separately.
It’s still a nice starter kit for creating beautiful nail art that would make an excellent gift because it comes in a pretty box.
This set is also great to get as an addition to a starter kit you already own for creating new designs with glitter.
Translucent Glitter Polygel Nail Kit
Makartt Jelly Glitter
Makartt Jelly Glitter polygels are similar to the Makartt Jelly ones but have glitter mixed in.
This polygel starter kit comes with 4 pastel polygels only: pink, silver, purple, and blue. The pink one is a cute Barbie pink with glitter.
It also contains a few necessities: a top coat, a base coat, a dual-ended tool, a nail file, and a great selection of dual forms.
You get 72 dual forms in 12 sizes and 2 shapes: curved and flat.
The kit also comes in a lovely pastel-colored gift box.
These polygels are even prettier than the non-glitter ones. You can buy them as an additional set to mix and match with other polygels, especially with the jelly ones.
A downside of the kit is the small size of the tubes. And this kit doesn’t include the slip solution.
What are the advantages of polygel nail kits?
Polygel has the same basic ingredients as gels, acrylics, and gel nail polishes.
It’s quite strong but feels lighter on the nails than gels and acrylics.
You won’t feel it while you’re wearing it.
Some professionals believe it’s even stronger than acrylics.
And polygels are long-lasting. You can wear them without lifting for up to 3 weeks.
Polygel is more viscous than gel. It’s pretty easy to use.
No need to worry about the monomer vs acrylic powder ratios either.
Polygel has the perfect consistency right out of the tube (it usually comes in tubes).
It’s very beginner-friendly.
Like acrylics, it always stays where you place it. Polygel is not runny, unlike builder gel.
And you can continue working with polygel for as long as you want. It won’t air dry before you have the time to distribute it.
This material can only be cured under a UV/LED lamp, like gels.
But no need to layer it like a gel polish. The UV/LED lamp will be able to cure a thick layer of this product.
Polygel is a low odor material so it’s nice to work with if you can’t stand strong chemical smells.
The material is sometimes also sold under the name AcryGel, since Polygel is a registered trademark of Gelish.
Dual forms
Another huge advantage of polygels is that you can use dual forms with it instead of paper or foil forms.
Dual forms are perfect for beginners.
They are very easy to use and convenient.
These forms help you build perfect nail extensions in a few simple steps.
Other materials for nail extensions, like gels and acrylics, require paper or foil forms, or tips, and they are more difficult to use for beginners than dual forms.
Dual forms come in several sizes. Make sure the ones you choose are slightly bigger than your natural nails.
Makartt Dual Forms

How to apply polygel?
Preparation
The preparation process is the same as when you build gel nail extensions.
Push away the cuticles, cleanse the nail plate with a nail cleanser, use a dehydrator, and apply some primer either over the entire nail plate or only to the free edge.
Base coat
Base coat is always necessary when you are working with polygels.
Polygel is not adhesive to natural nails enough on its own. So your extensions will fall off if you don’t use the base coat.
Rubber base coats work especially well with polygels.
Make sure to apply the base coat to your natural nails only.
No need to apply the base coat to the tips or forms.
How to apply polygel
There are two ways for applying polygel to your nails.
The easiest way how to apply polygel is with the help of dual forms.
First, you need to squeeze a pea-sized bead of product out of the tube onto the special spatula picker tool that usually comes with your polygel kit.
After that, place the bead with the spatula onto the dual form.
Next, you need to distribute the polygel over the dual form to the desired length and make it smooth.
Put the dual form with polygel onto the nail and place your hand under the lamp.
Slip solution

You will need a special slip solution for working with polygels.
It eliminates friction and lets you push the polygel into place and smooth it out after that. It also eliminates stickiness.
Slip solutions are usually low odor, they are not similar to the acrylic monomer.
You can pour some slip solution into a dish for the acrylic monomer. However, the solution evaporates quickly. So don’t use a shallow dish for it.
If you don’t have a slip solution you can use 99% Isopropyl Alcohol or any other rubbing alcohol instead.
Use an acrylic brush for picking up the solution.
Dip the brush into the liquid, and wipe the excess solution off by swiping the brush lightly against a paper towel and start working with polygels.
Curing polygel
Just like gels and gel nail polishes, polygel should be cured under a UV/LED lamp.
Polygel cures as fast as gel nail polishes do. In only 30-90 seconds under an LED lamp.
SUNUV 48W UV LED Nail Lamp

But for best results, cure one side of the nail for 30-90 seconds, then turn the hand and cure the other side for 30-90 seconds under the lamp.
After you cure the polygel, remove the dual form by applying force to each side separately.
Normally polygel doesn’t cause any heat spikes in the lamp and doesn’t leave a sticky layer.
But if any tackiness is left just wipe it off with rubbing alcohol.
The next step is filing and shaping your polygel nails.
Tips or forms
The second way how to apply polygel is spreading it over tips or forms.
Attach the forms to the nails or glue the tips with special glue.
Again, squeeze a bead of polygel out of the tube onto the spatula picker tool.
Place the bead onto the middle of your natural nail plate.
To find that spot, divide the area between the cuticle and the beginning of the free edge (not the tip of the free edge) in half lengthwise.
That spot should be the highest point of your polygel nail or its apex.
You should distribute the polygel and form the extensions in almost the same way as you do with acrylics.
Use an acrylic brush. And just like you need to do with dual forms, dip it into the slip solution and wipe off the excess liquid.
Flatten the bead in light tapping motions and continue spreading the product towards the free edge.
Smooth out the polygel that you’ve just applied with stroking motions, dipping your brush into the slip solution when needed.
Remove the excess polygel that goes over the nail tip if you are doing an overlay on natural nails. Or continue extending it over the glued tip or form to the desired length if you are creating nail extensions.
Add another bead closer to the cuticle area and shape the smooth slope from your polygel nail apex down to the area near the cuticles.
If you need more material near the free end of the extensions, especially if your extensions are pretty long, add another bead and spread it to the free edge.
However, make sure you don’t have too much material at the edge because that can make your extensions break.
Usually, 2-3 beads are enough.
Curing polygel on tips or forms
It’s recommended to cure each portion that you apply separately before adding more material or your extensions may get messy.
Filing and buffing
Polygel nails are easy to smooth with a brush dipped in rubbing alcohol.
And if you’re working with dual forms the top surface will always come out smooth.
So polygel nails may require less filing and buffing than gel nails.
But you’ll still need to file a few areas with a 180 grit nail file to make your overlays or extensions look perfect.
Always file the tip of the nail to make it smooth and to create the desired nail shape and length.
Gently file the area from the apex to the cuticles to create a very smooth slope.
Avoid buffing the surrounding skin.
Buff the sides of the nail and file the slope from the apex to the end of the free edge to make it smooth too.
If you’re using dual forms, file the excess material from under the free edge. It’s easy to do it with a nail e-file.
Top coat
As soon as you’ve achieved the desired shape, look, and degree of smoothness, you can apply the top coat, like you normally do with gel overlays and extensions and gel nail polish manicures.
You can also create a matte look with a matte gel top coat.
Using polygel nail kits with gel nail polish
You can paint a coat of gel nail polish over your polygel nails if your kit doesn’t have the color that you’re looking for.
The polish will stay on polygel nails even better than on the natural nails.
How to remove polygel?
Polygel, like builder gel, and unlike gel nail polishes, is not a soak-off material.
You can’t soak it off with acetone.
You’ll need to file it off with a nail file or a nail drill at a low speed.
File most of the product down to a very thin layer on your nails.
And then you can gently buff the polygel residue off the natural nail.
Alternatively, you can soak off the remaining material in the same way as gel nail polish: by wrapping your fingertips in foil with acetone-soaked cotton balls pressed against the nails.
Unwrap your nails in about 10 minutes and peel the remaining polygel off.
MelodySusie Professional Nail Drill

Polygel vs gel nail polish kits
Polygel is a builder material used for nail extensions and overlays. While gel nail polish only provides a color coating. You can’t create extensions with gel polish.
However, what these materials have in common is that they can both be cured only under a UV/LED lamp and won’t air dry.
Gel polish is a soak-off material, while polygel can only be filed off.
Polygel vs builder gel kits
Nail builder gel is polygel’s predecessor.
It’s another material that has to be cured under a UV/LED lamp.
Just like polygel, builder gel kits are used for creating nail extensions and overlays.
However, polygel is much easier to apply and distribute than gel. It stays where you put it and doesn’t run, while the gel is very runny and you need to work quickly.
Polygel doesn’t self-level as well as builder gels do.
But when you are making polygel nails you can smooth them out with a brush moistened with the slip solution. So you won’t need to file and buff them too much after you cure them.
Whereas, with gels, you may need to buff them quite a lot because you can’t smooth out your gel extensions while you are applying them.
Also, gels may cause a burning sensation during the curing process while polygels don’t burn.
Polygel vs acrylic kits
Acrylics are another predecessor of polygel.
Acrylics are the oldest material on the market, they’ve been used for making nail extensions and overlays for decades.
When making polygel nails you can just squeeze the product out of the tube and place it on your nails.
But acrylic nail kits consist of acrylic powder and a liquid monomer that binds this powder.
So to create acrylic nails you need to dip your brush in the monomer and pick a bit of powder to form an acrylic bead and place that bead on your nail.
However, it’s not easy for a beginner to pick the right ratio of monomer and acrylic powder.
You must also form the acrylic nails very quickly before the material dries.
Unlike, polygels and gels, acrylics simply air dry.
You don’t need to use a lamp with them.
But polygel is much easier to use than acrylics.
Also, the acrylic monomer has an awful smell, and polygel doesn’t.
Polygel is a perfect material for nail overlays or extensions whether you’re a beginner or a professional. If you’re still unfamiliar with this product then you just have to try your hand at using polygel. You’ll be surprised at how easy to use and gorgeous-looking it is.
Recommended reading:
Best Polygel Nail Kit Reviews And How To Apply Polygel At Home
Is Polygel Bad For Your Nails? 9 Reasons Why It’s Safe
Best Glitter Polygel Nail Kits
Best And Safest Neon Polygel Nail Kits
Best Polygel Dual Forms For Perfect Nail Extensions
Overlay Nails 101: Acrylic And Gel Nail Overlay On Natural Nails – The Ultimate Guide
Best Professional Gel Nail Polish Brands Used In Salons
Best Gel Base And Top Coat: The Updated List Of The Best Gel Nail Base And Top Coat Sets
Best No Wipe Gel Top Coat: An Honest Review Of 12 Best No Wipe Top Coat Gel Brands
Non-Toxic Gel Nail Polish Brands 101: Choose The Safest Gel Nail Polish
Most Popular Shellac Colors – The Ultimate List Of 15 Best Shellac Colors For Fantastic Manicures
CND Shellac Ingredients And What They Mean
Best Nail Dehydrator And Primer: The Ultimate Guide
6 Best Glass Top Manicure Table Units That May Be Perfect For Your Salon